Hello. Welcome. 👋
This is React Native 101: A post to help you build your first mobile app, even if all you've ever done is write JavaScript. Especially if all you've ever done is JavaScript.
If you know all about mobile apps, this article might not be for you. I’m a frontend engineer; I don’t know mobile. I built an app once, but it was terrible and ugly and some people downloaded it, but they didn’t know my email address, thank god. I’d never hear the end of it 😳
That’s the perspective I’m writing from.
If you’re a mobile engineer, my perspective might look odd. You will learn the basics of React Native anyway.
If you’re an engineer who doesn’t know JavaScript, this article is probably not for you. Sorry.
If you’re a JavaScript engineer thinking about mobile apps, this article is for you 🙂
If you’ve never used React before, awesome! I’ll explain.
This article is about the basics. There’s enough to get your feet wet and see what React Native is all about.
We’re going to cover the rest in future articles. You’ll get two articles per month. Just subscribe to get updates by email.
Today’s app is not the best app in the world. No, it’s just a tribute. A taste of what React Native can do for you.

I was going to lead with a Why React Native and a Why React section, but you know what, screw that. Let’s build stuff!
In 46 lines of code, you’ll have an app:

6 of the cutest pictures ever with AI-generated captions.
Your first app
We’re building a cute image clicker. Tap on the right to go forward, tap on the left to go back. Remember: I know it’s not the best app in the world; it’s a tribute.
Now, I’m going to say things in this guide, and they might confuse you, especially if you’re new to React. Don’t worry, that’s normal! I’m confused all the time.
Follow along, try things out. Play. You will have a small working app when we’re through. Then I’m going to explain everything in future articles.
Savvy?
You can see the final code on Github here. Commits follow this article.
I’m assuming you have a Mac with Xcode installed. That’s what I have. Let’s also assume that we’re building for iOS. That’s the phone OS I use 🙂
You need Xcode for the iPhone simulator so that you can run apps locally on your machine. You’ll never have to open Xcode. Unless you want to, I guess. I hear its text editor is pretty good.
Unfortunately, you can’t build iOS apps on Linux or Windows. Those are Apple’s rules 😞 But you can build for Android!
To work with Android, you’ll need Android Studio. Again, just for the simulator. Facebook’s official docs have a great guide for all 5 dev OS/app OS combinations. I shan’t repeat here.
Once you have node.js and a simulator, you should install react-native-cli: The suite of tools that compiles and runs your app.
$ npm install -g react-native-cli
You’re ready to build an app! 🎉
PS: npm is the node.js package manager. We’ll use it to handle dependencies throughout this React Native School.
/aside
Start a new project
The easiest way to start a new React Native project is with the react-native utility.
$ react-native init JustATributeApp
react-native init creates a new JustATtributeApp directory, installs the necessary dependencies in JustATributeApp/node_modules/, sets up a JavaScript compilation pipeline using Babel, and creates two index.js files: One for Android, and one for iOS.
It also puts some native app stuff in JustATtributeApp/android and in JustATributeApp/ios. Looks like the basic setup for an Android/iOS native app, but I can’t read that code. I’m a JavaScript guy.
The point is, you don’t need to know, and that’s great. The fewer details you have to worry about, the more time you have to build cool apps.
We need two index.js files because most apps offer a different experience on Android and iOS. You can share code between them and you should, but you’ll want to put it together differently. The easiest way to do that is to use a different index file.
Run & debug your app locally
There are two ways to run your app.
You can open JustATributeApp/ios/JustATributeApp.xcodeproj in Xcode and hit the run button. But then you’re in Xcode, and you might get tempted to fiddle with things that don’t need fiddling. I know I would.
My favorite approach is to run a command:
$ cd JustATributeApp
$ react-native run-ios
Replace run-ios with run-android if you’re building for Android. Or if you just want to see what Android looks like. I imagine it’s much the same at this point. No, I haven’t tried yet. 😇
When you do that, react-native does a couple of things for you.
It runs the simulator, compiles your app, starts a dev server, and sets up hot loading. I don’t know the details, but I imagine it’s similar to how it works on the web.
A local server serves compiled JavaScript files, and a client loads and runs them to build an interface. On the web, it builds HTML; on mobile, it builds a native interface.
PS: you can see what the compiled code looks like, if you open http://localhost:8081/index.ios.bundle?platform=ios&dev=true&minify=false in a browser. It’s not very useful, but proves that there is indeed a server involved
/aside
The result is a Hello World app.

Welcome! 😍
Much like on the web, Cmd+R restarts the app from scratch. That part is familiar. Cmd+D opens a dev menu. That part is new.

We have many options. I suggest enabling either Live Reload or Hot Reloading while you work. Live reload restarts your app every time it sees you’ve changed a file so that you’re always running fresh code. It’s reliable and works every time.
Hot reload achieves the same result, but it tries to swap components with their new versions without reloading. This is great for complex apps because you don’t have to keep navigating your interface, but it often leads to strange corner cases. Use with caution.
Another great option is Debug JS Remotely. It opens a browser window on http://localhost:8081/debugger-ui, which takes over running your JavaScript code. This slows down the app but lets you use your favorite browser-based debugging tools.
Yes, it’s the very same JavaScript console you’re used to. Although React Developer Tools for Chrome don’t load up because there’re no React elements on the page. That’s a shame 😕

Then again, using the Inspector gives you all the same options. Click a thing and see how its styled and what it does.

It’s got more fun debugging tools like a network monitor, performance analyzers, and such. We’ll explore them while we build more serious stuff.
Build your first mobile UI
Ok, you know how to start a project, run your app, and some debugging basics. Let’s fire up the editor and write some code.
Use whichever text editor you’re used to. I like Emacs; many people use WebStorm. I’ve heard Atom is great for JavaScript and Sublime looks like a popular default. Make sure syntax highlighting and code indentation work for JSX.
/aside
We’re building a small app, so all of our code goes into index.ios.js (or index.android.js if you’re building for Android).
react-native has set up some code for us already. It comes in 3 sections:
- imports to load React and some React Native components
- the
JustATributeAppcomponent with a render method - style definitions because React Native doesn’t use CSS
We’re using modern JavaScript by the way: ES6. If you’re not used to the syntax, you’re not alone. I’ve built an interactive ES6 cheatsheet to help you out.
import React, { Component } from 'react';
import {
  AppRegistry,
  StyleSheet,
  Text,
  View
} from 'react-native';

export default class JustATributeApp extends Component {
  render() {
    return (
      // JSX stuff
    );
  }
}

const styles = StyleSheet.create({
    // style stuff
});
Like that.
Some Constants
Let’s define the 6 cute images and add an import for Image (the component for rendering images) and an import for TouchableHighlight. We’ll use it to make the image clickable.
import React, { Component } from 'react';
import {
  AppRegistry,
  StyleSheet,
  Text,
  View,
  Image,
  TouchableHighlight
} from 'react-native';

const Images = [
    {
        uri: "https://i.imgur.com/mxgtWKt.jpg",
        label: "Cat on a blue blanket"
    },

    {
        uri: "https://i.imgur.com/XCRnNWn.jpg",
        label: "A cat toy"
    },

    {
        uri: "https://i.imgur.com/dqQX1K0.jpg",
        label: "A close up of a dog"
    },

    {
        uri: "https://i.imgur.com/nZXbSbh.jpg",
        label: "Sheep next to a cat"
    },

    {
        uri: "https://i.imgur.com/mXCjefR.jpg",
        label: "Cat laying on the grass"
    },

    {
        uri: "https://i.imgur.com/AGyxRcc.jpg",
        label: "Bird sitting on a railing"
    }
];
You didn’t think we were going to build an image search client and AI image captioner in 46 lines of code, did you? Don’t be silly. That would take at least 47 lines.
If you refresh the simulator, your app will look the same as before. Let’s fix that.
Styles
We need to expand the default style definitions. It’s easier to explain if we do it before rendering components. Plus it looks magical when they immediately look perfect.
No designers were involved in the making of these stylesheets.
const styles = StyleSheet.create({
    container: {
        flex: 1,
        justifyContent: 'center',
        alignItems: 'center',
        backgroundColor: '#abcdef',
    },
    image: {
        flex: 2,
        width: 320,
        justifyContent: 'flex-end',
        alignItems: 'center'
    },
    imageLabel: {
        textAlign: 'center',
        backgroundColor: 'rgba(100, 100, 100, 0.5)',
        color: 'white',
        width: 320
    },
    empty: {
        flex: 1
    }
});
React Native uses JavaScript to define stylesheets. It looks like CSS because it’s meant to. You can think of each key in the main dictionary as a CSS class, and each child key as a CSS property.
They use camelCase instead of dash-case. Is that what it’s called? background-color becomes backgroundColor, text-align is textAlign and so on. You get the idea.
There’s no nesting unless you use extensions. We’ll explore those later.
We changed container.backgroundColor because we could, removed welcome and instructions because we’ll get rid of them, and added image, imageLabel, and empty.
React Native uses flexbox to layout boxes on screen. We use flex: 1 and flex: 2 to specify how high a priority something should get.
This will make more sense when we put images on screen.
Generally speaking, you should never define fixed widths or heights in React Native. Let the layouting engine do that for you. Your job is to define proportions.
The style update made our tribute app look like crap. 💩

I do like the new blue.
Rendering images with captions
Great. We have the styles and the image definitions. Let’s make that render method.
That’s how React renders UI, by the way. You build components with one render method each. It defines what a component looks like, which child elements it uses and such.
We’re using JSX, which looks like HTML in your JavaScript. This makes it familiar and easy to use. But it’s not HTML; it’s JavaScript behind the scenes, which makes it efficient to render and totally awesome to use.
One of my favorite features is that you can put any JavaScript object or function in what looks like an HTML attribute. We’ll use this a lot.
export default class JustATributeApp extends Component {
    state = {
        index: 0,
    }

    render() {
        const image = Images[this.state.index];

        return (
            <View style={styles.container}>
                <View style={styles.empty} />
                <Image source={{uri: image.uri}}
                       style={styles.image}>
                    <Text style={styles.imageLabel}>{image.label}</Text>
                </Image>
                <View style={styles.empty} />
            </View>
        );
    }
}
We gutted the entire render method that react-native initialized for us. We don’t need it 🙂
Okay, we kept the main <View> component. It’s analogous to a <div> in HTML.
We use two <View>s with the empty style – flex 1 – and an <Image> with an image style – flex 2. This combination vertically centers our image and gives it a height of 50%. We had to fix width at 320px because React Native doesn’t understand 100% sizing.
Inside the Image, we put a <Text> element that renders our caption. It gets a partially transparent grey background and centers white text.
To get the image URL, we used a combination of this.state and the Images constant. State is a React thing that stores… state. You can think of it as a magic property that triggers re-renders when it’schanged.
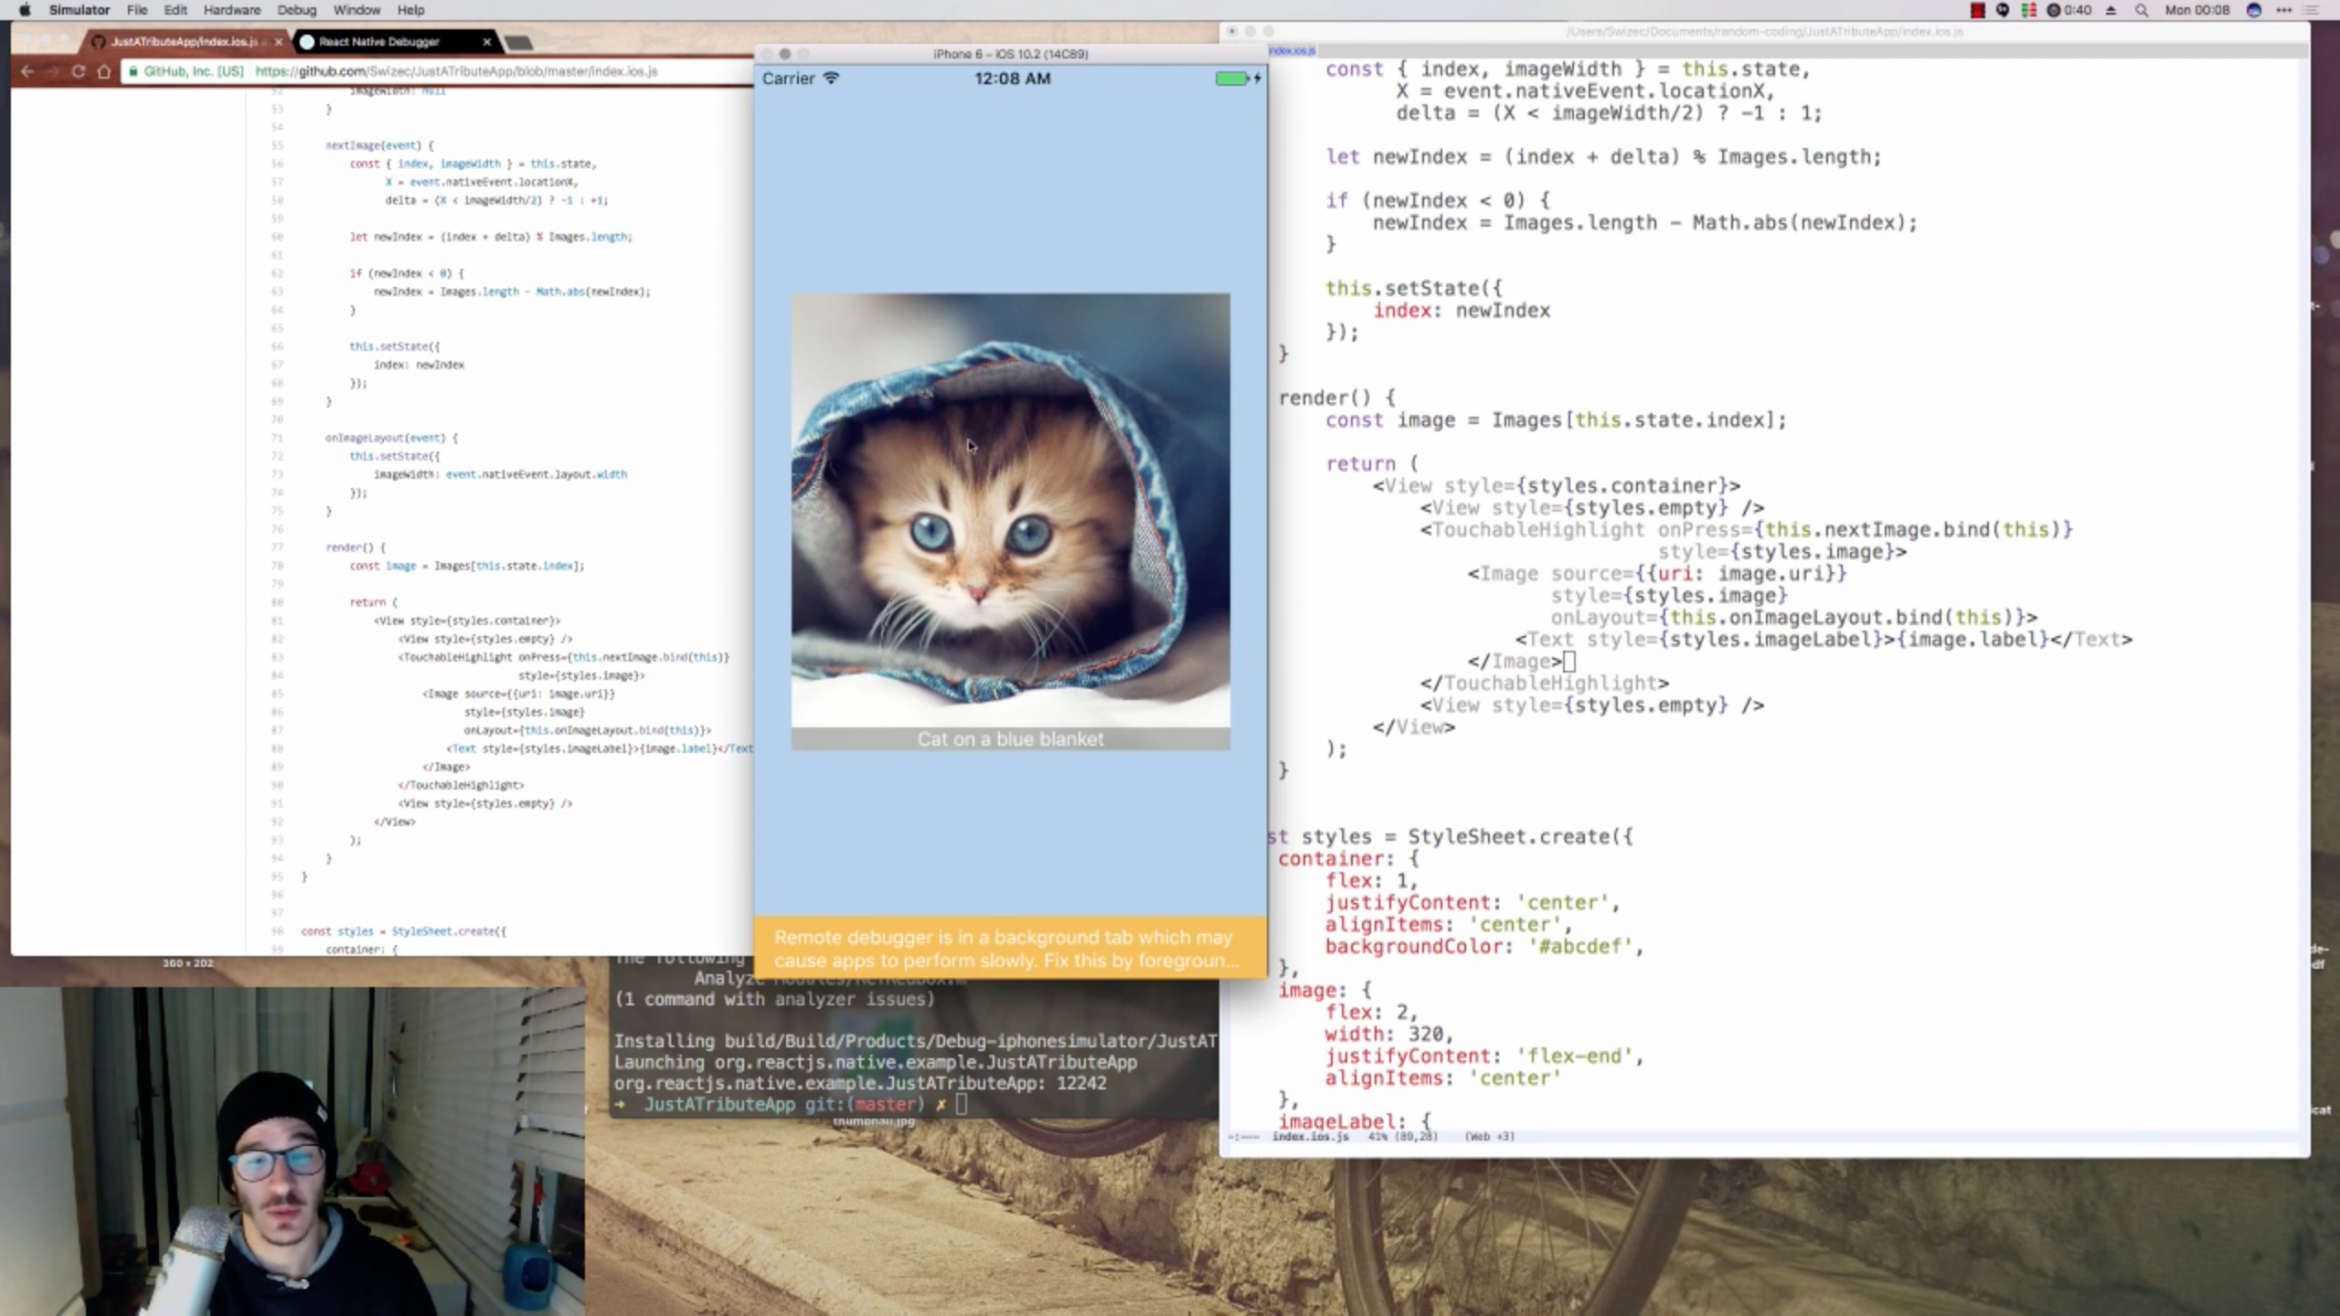
Our app now renders a kitten.

Make it interactive
One kitten is great. Let’s render more 🙂
Click on the right side of the image for next, left for previous.
To do that, we wrap our image in a <TouchableHighlight> component and add some logic that manipulates this.state.
export default class JustATributeApp extends Component {
    state = {
        index: 0,
        imageWidth: null
    }

    nextImage(event) {
        const { index, imageWidth } = this.state,
              X = event.nativeEvent.locationX,
              delta = (X < imageWidth/2) ? -1 : +1;

        let newIndex = (index + delta) % Images.length;

        if (newIndex < 0) {
            newIndex = Images.length - Math.abs(newIndex);
        }

        this.setState({
            index: newIndex
        });
    }

    onImageLayout(event) {
        this.setState({
            imageWidth: event.nativeEvent.layout.width
        });
    }

    render() {
        const image = Images[this.state.index];

        return (
            <View style={styles.container}>
                <View style={styles.empty} />
                <TouchableHighlight onPress={this.nextImage.bind(this)}
                                    style={styles.image}>
                    <Image source={{uri: image.uri}}
                           style={styles.image}
                           onLayout={this.onImageLayout.bind(this)}>
                        <Text style={styles.imageLabel}>{image.label}</Text>
                    </Image>
                </TouchableHighlight>
                <View style={styles.empty} />
            </View>
        );
    }
}
Wow, more code 😳
But it’s okay. It’s not difficult code.
We added imageWidth to state because React Native can’t detect how wide a component is on the fly. You need to hook into the layouting engine and save that info for later.
This might be an antipattern. I wanted flexible logic so I can make the image 100% wide when I figure out how. Mobile devices change dimensions. Especially when you rotate them.
Then we have nextImage. It’s an onPress callback that triggers when our user taps the cute kitten. When that happens, we calculate whether the press was left or right of center, calculate the new image index, and make sure it doesn’t reach for undefined images.
We use this.setState to update the index in state. This triggers a component re-render, which sees the new index, and renders a new image. Nifty, isn’t it?
The onImageLayout function helps us set state.imageWidth. It’s an onLayout callback event for the <Image> component.
One thing to keep in mind with React Native is that you can’t attach click/touch events to random components. You have to use TouchableHighlight to wrap touchable areas. I imagine this can get unruly, but it makes sense.
I like that TouchableHighlight takes care of giving UI touch feedback to the user as well.
You now have an interactive cute image clicker.
Congratz, you’ve built your first mobile app! 👏👏👏
If it didn’t work, consult the Github project. Commits follow steps in this article.
What’s next
You now know the very basics of React Native: How to set up a project, how to run the app locally, and tools to use when debugging. And you’ve built your first app! That means you know roughly how React components work, how to style them, and some caveats that make mobile different than the web.
Over the next 23 articles, I’m going to show you all the bells and whistles. You’ll be a pro mobile developer when we’re done.
This is the start of something beautiful. ❤️


